Deleted
Deleted Member
Posts: 0
|
Post by Deleted on Nov 20, 2009 21:40:32 GMT
My son is a fireman and and it's his birthday shortly. He asked me to start of a small collection for him so last year I built this little item ... 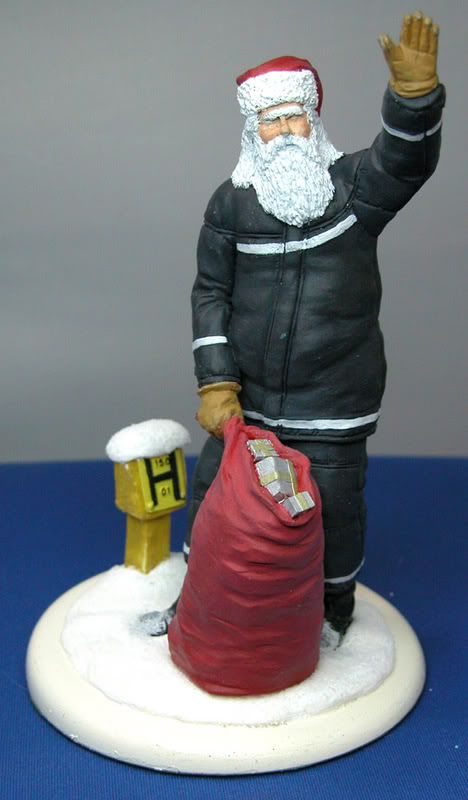  ... so, I thought this year I'd increase his collection with this ... 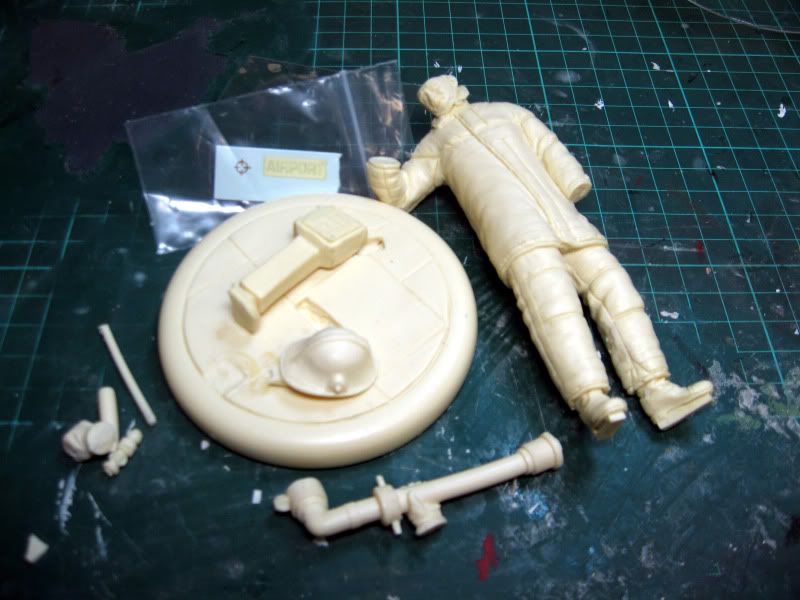 ... it's another 120mm figure, this time it's an airport firefighter. It's been in the stash for some time and a couple of the pieces are slightly damaged so there's a chance to modernise the pieces whilst it's being repaired. One of the items which requires attention is the key and bar ... 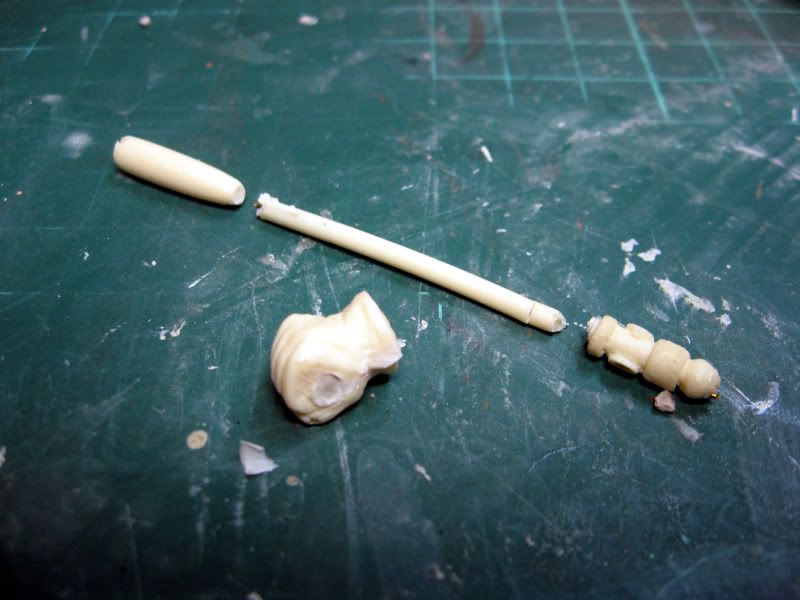 ... the resin is a little brittle so I'll have to drill out the hand, scratch a new bar and graft the kit part to the end of the new piece. I'll keep you all informed of the progress. |
|
Deleted
Deleted Member
Posts: 0
|
Post by Deleted on Nov 22, 2009 20:03:29 GMT
I've spent a couple of hours in the workshop this afternoon, and here's the progress ... 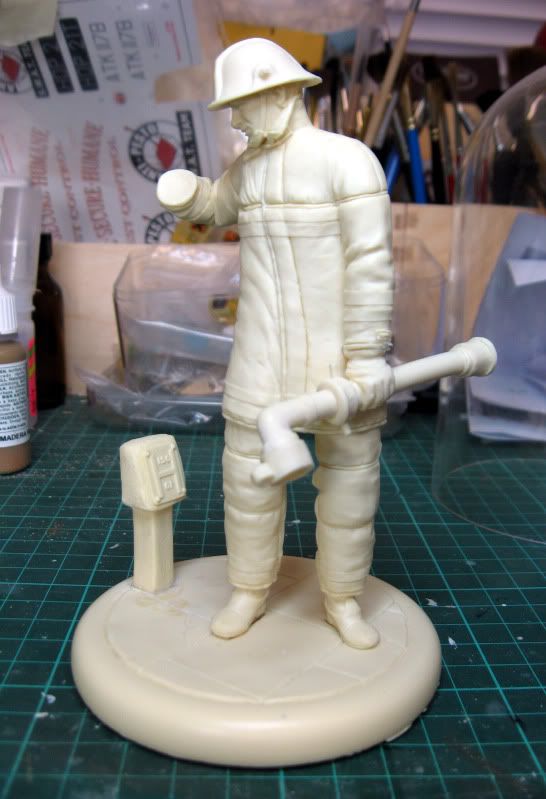 ... The helmet has been cleaned up and glued in place, as has the standpipe, there's a small gap between the hand and the arm which will be filled with putty and cleaned up. The hydrant post has been glued in place, the base now requires sanding in order to make it sit square. The figure has been temporarily tacked into place on the base using a small amount of hot glue, just to give an idea of what the finished figure will look like on the base. The kit is one of Fire Brigade Models range of 120mm figures. I've built several in the past, mostly for my own collection, but the occasional figure was built as a retirement gift for colleagues at the station. The next step is to rebuild the bar and key using plastic rod, not a problem. |
|
Deleted
Deleted Member
Posts: 0
|
Post by Deleted on Nov 29, 2009 11:32:33 GMT
Time to get in the workshop this morning and rebuild the key and bar, I've got a fortnight to finish this figure. Pictures later.
|
|
Deleted
Deleted Member
Posts: 0
|
Post by Deleted on Nov 29, 2009 14:36:43 GMT
Ooops! ... the first coat of primer has gone horribly wrong, pictures of the progress when I've recovered from the first panic attack.  |
|
Deleted
Deleted Member
Posts: 0
|
Post by Deleted on Nov 29, 2009 16:16:43 GMT
I managed to remove the primer from the figure using good ole Mr Muscle. I have a feeling that the problem was caused by several things, the figure hadn't been washed properly, the primer may have not been immersed in warm water for long enough and it was probably too cold to spray anyway. Not to worry, all is well once again. First things first, I managed to repair the hydrant key using round rod stock, superglue and a couple of metal pins ... 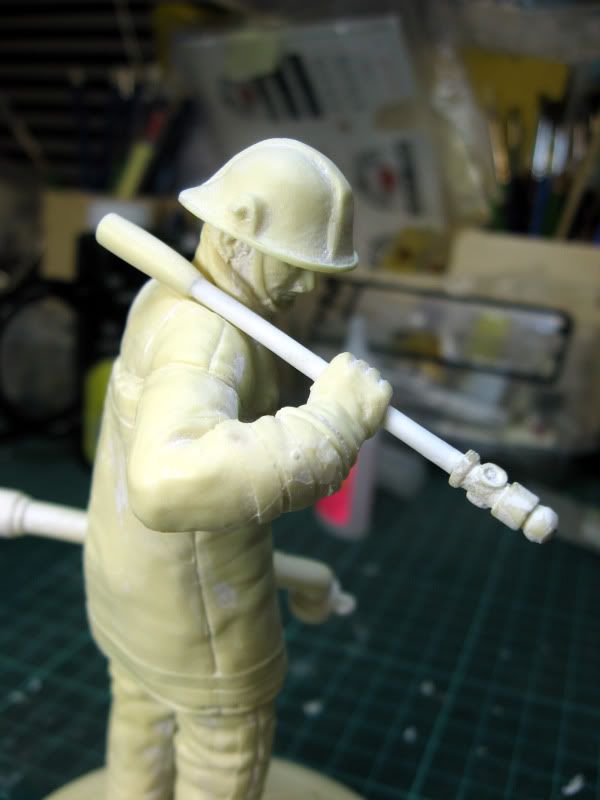 ... here's the figure as it stands at the moment ... 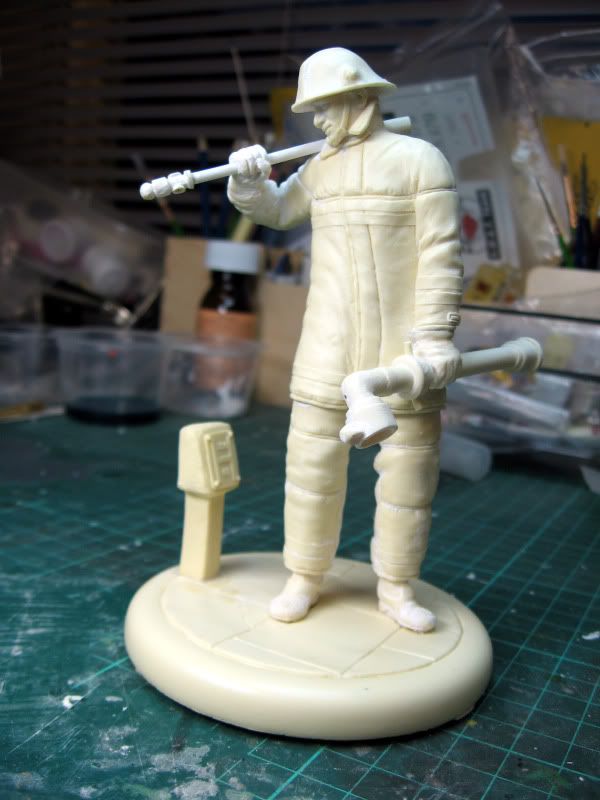 ... it's not yet secured to the base and after a final cleanup, it will be primed and allowed to settle for a couple of days. I've decided on the colour scheme. As it's an airport firefighter the tunic and leggings will be a sand colour, the reflective piping will be yellow and silver, the helmet will be yellow, gloves will be brown or blue and the boots black. I'm going to try the new Vallejo metal finishes on the standpipe, key and bar, more photos as it progresses. |
|
|
|
Post by voyager on Nov 30, 2009 9:14:53 GMT
Coming on - nice save on the key ;D Got Bill Horans' book off Wolfie and I'm really tempted to have a go at painting a figure so will watch with interest!
|
|
perry
Kit Basher

Posts: 75
|
Post by perry on Nov 30, 2009 14:33:23 GMT
Looks brilliant mate. I presume the sand colloured kit your refering to is the PBI gold kit. Cant wait to see this painted
|
|
Deleted
Deleted Member
Posts: 0
|
Post by Deleted on Nov 30, 2009 20:11:02 GMT
... I presume the sand colloured kit your refering to is the PBI gold kit. Ayup Perry, that's correct. Unfortunately I never got to wear the gold gear, anything from the old black Belton uniform upwards. I can remember when we first changed from black helmets to yellow helmets in the 70's, but the modern multi-coloured fire gear is a step too far for me, too much like a clowns outfit. Coming on - nice save on the key The bar is a little on the thick side, but with a little careful weathering it should look OK. Andrew, figure painting is my worst discipline. I have read lots of books about the use of artists paints but this figure will be painted with acrylics, possibly Vallejo. The Santa at the top of the page was painted with a mixture of enamel and acrylics. |
|
perry
Kit Basher
Posts: 75
|
Post by perry on Nov 30, 2009 20:38:10 GMT
Have you seen the new uniform for all uk fire and rescue services there rolling out, it looks awfull I hope Herts dont get it
|
|
Deleted
Deleted Member
Posts: 0
|
Post by Deleted on Nov 30, 2009 20:53:20 GMT
Have you seen the new uniform for all uk fire and rescue services there rolling out, it looks awfull I hope Herts dont get it Can't find a photo at the moment, I'll get my lad to send me a couple for reference. Basically, it's a clown suit, yellow, red and green with yellow helmets and black boots. |
|
perry
Kit Basher
Posts: 75
|
Post by perry on Nov 30, 2009 21:43:19 GMT
|
|
Deleted
Deleted Member
Posts: 0
|
Post by Deleted on Nov 30, 2009 21:45:33 GMT
Yep, it's a clown suit, and Derbyshire also have it.
|
|
perry
Kit Basher
Posts: 75
|
Post by perry on Dec 1, 2009 0:16:41 GMT
Poor chap's your son is with nottinghamshire isnt he? has he said anything about comfort / practability?
|
|
Deleted
Deleted Member
Posts: 0
|
Post by Deleted on Dec 14, 2009 22:51:07 GMT
It's been a hectic couple of weeks but I managed a few hours in the workshop yesterday and the figure is almost finished. I think I've found a reasonable facsimile for the PBI Gold fire kit. The dreaded skin tone for the face is next to be attempted. I have to finish this figure before the weekend so hopefully I'll be back in the workshop tomorrow evening to take a few photos.
|
|
Deleted
Deleted Member
Posts: 0
|
Post by Deleted on Dec 15, 2009 21:48:50 GMT
I didn't manage to do any work on the figure this evening, but here's a couple of photographs as promised. Here's the current stage of the figure as of this evening ... 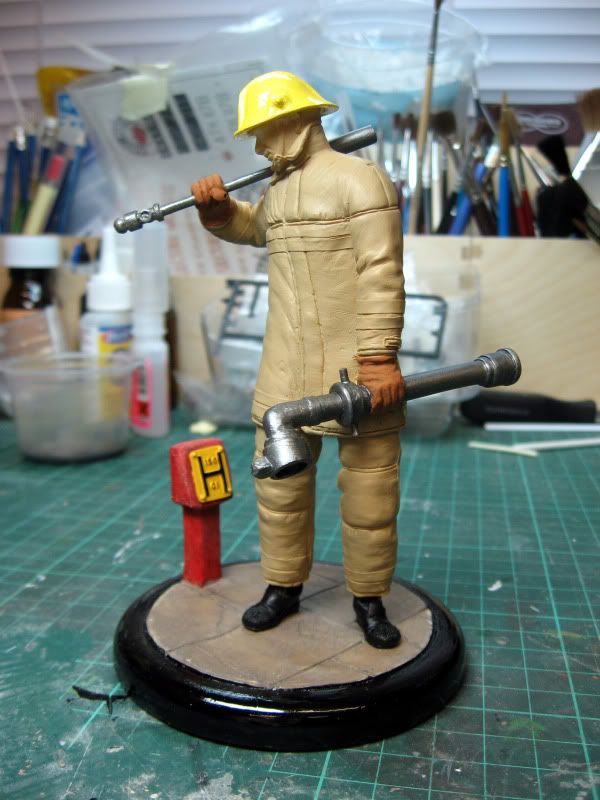 For those of you who like to know the details ... Firefighting Tunic and Leggings ~ airbrushed with Vallejo Model Air #028 Sand Yellow. Helmet ~ hand painted with Revell #12 Gloss Yellow. Boots ~ hand painted with Vallejo Model Air #71057 Black. Gloves ~ hand painted with Humbrol #62 Matt Leather. I had originally painted them Humbrol #25 Matt Blue in an attempt to replicate a pair of 'Firecraft' gloves, but the blue was too dark, I've found a tinlet of a lighter blue so I may repaint them. The standpipe, key and bar were hand painted with Vallejo Model Colour #70863 Gunmetal Grey, it's slightly dark but looks reasonable. Now for the base ... 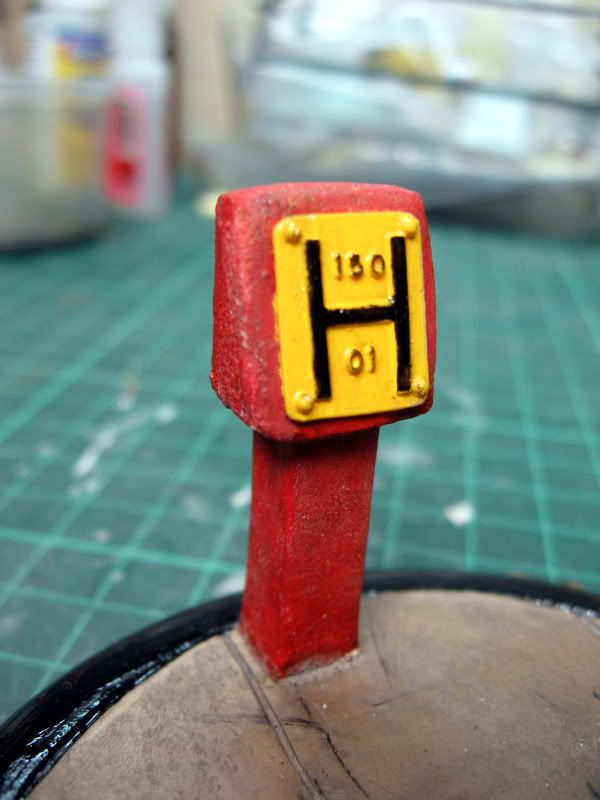 The hydrant post was hand painted with a couple of thinned coats of Vallejo Model Air #084 Fire Red, it gives the impression of a weathered concrete post. To further accentuate the effect, shortly after the second coat was applied I quickly brushed the post with a dry toothbrush, I'll add further weathering once the figure is completed. The hydrant plate was hand painted with Humbrol #69 Gloss Yellow, it's just right. The 'H' and the numbers were hand painted with Humbrol #21 Gloss Black. I wanted to replicate worn stone slabs on the base and choosing a colour was a bit of a task. I found a tinlet of Humbrol #121 Matt Light Stone, it's a light pinkish colour. I hand painted a couple of thinned coats, allowing each coat to dry thoroughly. I then made a thin wash of MIG #PO39 Industrial City Dirt and brushed this onto the base and voila' ... after a couple of coats of pigment, I had a dirty used stone base. So what's next? ... There are twin reflective strips on the fire tunic and leggings, one will be silver, the other will be yellow. My trick for reflective strip is to mix silver with white which gives the impression of reflective strip, that's OK for the silver, I'll have to think about the yellow, probably yellow and silver? Then there's the skin tone on the face, the hair colour and the chin strap. I also have a a clear acetate helmet visor to place on the figure. Time is running out for this project so I'll be in the workshop for the next couple of evenings, I'll keep you all informed of the progress. |
|
 Members' Forum")


