|
|
Post by karlos on Aug 30, 2012 7:47:12 GMT
|
|
|
|
Post by iansadler on Aug 30, 2012 8:22:45 GMT
Hi Karol, glad to see you back in the fold . Also nice to see a true modelers bench just looks like mine . Keep us upto date . Looking good so far cheers ian
|
|
|
|
Post by frankaplin on Sept 13, 2012 20:29:53 GMT
Yep looking good Karlos mate. But you have more paint on the workbase than on the model. 'Come on pull your finger out lol'. I like the workspace tho, As Ian ,mine is just as cluttered  |
|
|
|
Post by karlos on Sept 14, 2012 8:22:47 GMT
attached fuel tanks, spare track links to glacis, contemplating assembling tracks next, any hints to assembling magic track?......
|
|
|
|
Post by iansadler on Sept 14, 2012 18:34:49 GMT
Hi karlos , I will take a photo of the jig I use to make all my track sets up and post it up . It is made from scrap wood . cheers ian
|
|
|
|
Post by iansadler on Sept 16, 2012 9:52:49 GMT
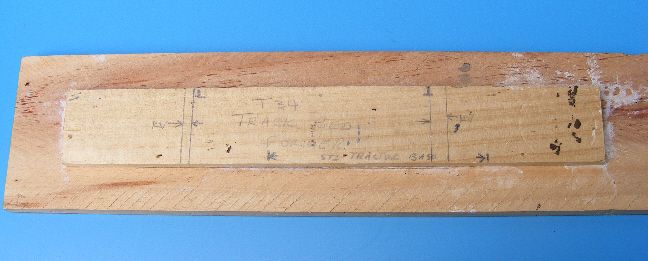
Hi karlos , this is the basic jig I use for making track sets . I used scrap wood, the top piece is the same width as the bottom plate of the tank hull , the bottom section is the same width as the tracks as if fitted to the hull . I make up 5 tracks and glue them , push them up against the edge and leave to dry . I turn the jig round and repeat on the other side . This allows both sets to harden off and remain straight . I keep repeating this till a full run of the bottom is completed on both sides . The vertical lines are the wheel centres for the wheels . I know that if I build up to that line I will have a set of tracks that are correct . Hope this makes some sence.  |
|
|
|
Post by iansadler on Sept 16, 2012 9:57:57 GMT
Hi karlos , this is a close up of the vertical lines. Because I work mainly with rusian tanks i can use this for nearly all from WW2 up to present day . Also i used it on my STZ tractor kit . Each set of verticals is for a specific tanks . Hope this if more clear anything i can help you with just post up and i will do my best to answer cheers ian  |
|
|
|
Post by frankaplin on Sept 16, 2012 18:36:58 GMT
Nice one Ian thats a good way for it.
Karlos.
I measure to centre wheel from front and rear wheels and make a length for the road lengths, repeat other side.
Start makeing lengths for top about half way between top rollers, also make four lengths between front /rear drives and leave all to dry.
Spray them and spray singles on spru for later.
Fix bottom lengths to wheels and then use one or two singles to go around front/rear sprocket and idler wheels.
The smaller lengths then with one glued wet each end till they line up with sprocket tooth and Idler .
leave to dry or continue with the singles around sprocket and idler till they become stait for the top run over the small idler wheels.
Then let dry.
If there are no Idle wheels its just a case of laying the track over the top of the road wheels.
If there are Idle wheels, then I use the short lengths that I made earlier and sprayed extra by useing the singles track pieces to give a sag if needed over the idle wheels.
Sounds long winded, but it allows you to link up and look like its all pinned correctly.
You can if you wish make the whole track in one piece by leaveing the sprocket wheel un- glued so you can remove for spraying not only the track, but also the under body for weathering extra.
Best when doing this method is to leave dry till hard.
This method does not need spraying till removed when dry.
Hope this helps.
|
|
|
|
Post by karlos on Sept 20, 2012 8:17:54 GMT
ooooeeeerrr , that sounds tricky , not sure fistfull of thumbs are up to it, hey ho will give it a go, assuming zen position now....
|
|