|
|
Post by Loiner on Jun 18, 2008 12:33:31 GMT
I've read a number of articles in various magazines on how they weathered their featured models, generally a variety of oil paint washes, weathering applied by sponge and by dry brushing were employed in most cases.
Of these I've only really tried dry brushing which seems to have a fairly good but limited effect. What method do you more experienced AFV modellers use to get a generally 'used in the field' look, but without over doing it?
|
|
|
|
Post by Paul Senter on Jun 23, 2008 11:25:14 GMT
Loiner
There are lots of different ways to achieve weathered effects. I am by no means an expert but my favourites are dry brushing which you mentioned, washes and oil paint dots. Most aircraft modellers like to enhance the panel lines on an aircraft by flowing very thin dark paint into the lines which gives the impression of shadow and therefore depth, I usuually do the same with armour, particularly around the engine area, wheel hubs and gubbins behind the wheels - this is all done in a dark almost black oil paint. It is also useful to do the same technique but with a middle stone/dark yellow on the superstructure to simulate dust build up, as the thinners evaporates the paint will remain in the recesses.
Oilpaint dots is a really good way of simulating rain marks or rust on the sides of afv's (look at the Rail Group Build for examples). This is a very easy technique and only requires you to put a small dot of neat oil paint where you want the stain to start. You then draw a thinners damp brush vertically down the dot, dragging it and thinning it as you go. If it looks a little much then repeat the brush process with a clean thinners damp brush again. A series of dots will give you a rain streaked side. Most colours will do, combinations of black, white, umber etc will give a good effect. Similarly using burnt umber or burnt ochre on their own will give a streaky rust effect - have a go and see what you come up with.
There are lots of other techniques but the best thing to do is have a go and if it works let someone know.
Paul
|
|
|
|
Post by Loiner on Jun 23, 2008 13:24:18 GMT
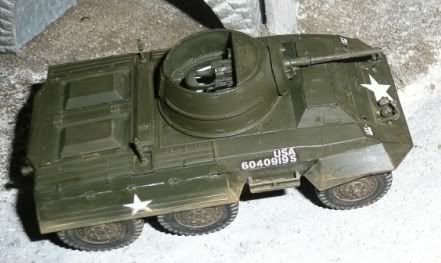
Thanks for these helpful comments. I'm currently working on an M8 Greyhound in 1:48th, and will try being a bit more adventurous with some of the above techniques. I generally err on the side of caution and don't like to over do the affects but the above will certianly help. I'll try to post some photos on here when it progresses.
|
|
|
|
Post by Paul Senter on Jun 24, 2008 13:06:05 GMT
Loiner
Agree with you regarding caution, particularly in 1/48 - when I do armour I tend to go for 1/35 so you need to be a little cautious anyway in the smaller scale otherwise your finely crafted piece of work will look as though it has been fired up by Oddball's paint shells from Kelly's Heroes.
Best of luck and look forward to the phots - coming to the end of a Pz IV (Dragon Smart Kit) and have reached the weathering stage now so I shall try and post some pics as I will be using those techniques I described above.
Paul
|
|
|
|
Post by Loiner on Jul 24, 2008 12:31:21 GMT
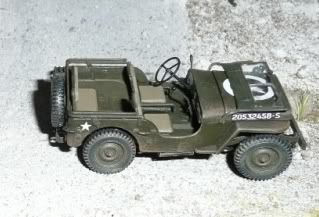
The M8 and a Jeep are coming along nicely but the weathering has gone on a bit heavy. I'll need to try a few more ideas before considering them complete.   Haven't added any rust on these as I don't think they would be in bad condition and probably the dirt would cover the rust. The M8 still needs finishing with parts still to add. I'll get some better photos when the pair are finished. Then I've gt an M10 tank destroyer lined up for the next project  |
|