Deleted
Deleted Member
Posts: 0
|
Post by Deleted on Dec 6, 2008 22:15:56 GMT
Cheers Brian, the Solartex arrived yesterday morning. I was chatting to our club's resident guru, Brian Fawcett about the construction of the side panels on the jeep, and he's made the following observations ...
(1) if Solartex is used, it will need careful manipulation in order to produce the side panels as the backing to the material is glue which is actuated by heat, that could be a problem.
(2) If using tissue and pva, which incidentally is my preferred method, I will need to construct a frame on which to place the tissue, not a major problem but it could get messy.
(3) I could also use nylon sheet, which when brushed with 'Future', could be made stiff enough to cut into shape.
(4) Another option would be to use pewter sheet, this could turn out to be the best option as it can be easily cut into shape and fashioned into panels.
As I've only got a couple of weeks to finish this project, I won't have time to investigate the alternatives fully and may eventually model the jeep without the side panels, we'll see how much building time I get.
|
|
|
|
Post by brianthemodeller on Dec 7, 2008 18:47:58 GMT
(1) if Solartex is used, it will need careful manipulation in order to produce the side panels as the backing to the material is glue which is actuated by heat, that could be a problem. (2) If using tissue and pva, which incidentally is my preferred method, I will need to construct a frame on which to place the tissue, not a major problem but it could get messy. Nick, Combine both of the above... Make a frame (I suggest welding rod or coat hanger) and then superglue the solartex to the frame. I have used this method to make a sliding body in 1/50 and it works a treat (see below). The heat-glue is really only for the aircraft modellers as it slightly shrinks the solartex at the same time (remember tissue paper and dope?). Brian   |
|
Deleted
Deleted Member
Posts: 0
|
Post by Deleted on Dec 14, 2008 15:59:04 GMT
Right then, I've been in the workshop today and the jeep is ready for a spot of paint. I have several pics of the preserved vehicle, there's one below ...  ... as with all preserved vehicles, the paint scheme it's in at the moment may not be the paint scheme it would have had when it was in service. I've tried a quick paint patch of Vallejo (14) Olive Green, but it comes nowhere near the shade on the pics I have, even allowing for variations in the print. I've attempted to match the paint but the nearest I can get is Vallejo 11 (Tank Green). Anyone got any suggestions? Hopefully, the tow hitch will be done tonight ...  ... then, If I have the time, I can attempt to scratch the side covers. |
|
|
|
Post by neilscrim on Dec 14, 2008 18:31:02 GMT
Mr Olive drab is a tricky little b*gger to nail, there were so many variations.
Vallejo 94 (Russian Uniform WWII) is a good match for faded OD (and your photo) but might be a bit light. Also Humbrol 86 is a good start.
|
|
Deleted
Deleted Member
Posts: 0
|
Post by Deleted on Dec 14, 2008 20:24:38 GMT
Just finished for tonight, and the tow hitch is just about complete except for the tow ring ... 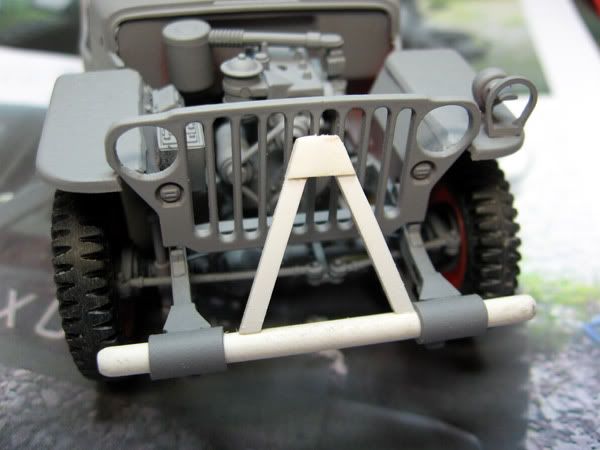 ... this week will be late finishes in the workshop after work as this model has to be finished. I don't think the side screens will be done though, but I'm not beaten yet, we'll see. As for the final colour scheme, looks like a spot of careful mixing!  |
|
ptcruiser
Moderator  Car & Motorcycle SIG Leader
Posts: 1,223
|
Post by ptcruiser on Dec 14, 2008 21:14:22 GMT
Back to the Solartex, I used it on my Thomas Flyer and I found it delaminated, freeing off the 'glue' layer. Used cyno with no probs. Front and rear "mudguards" are Solartex (white). 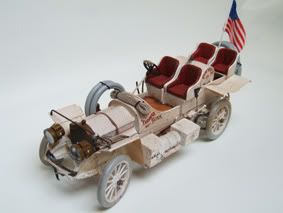  Rich |
|
Deleted
Deleted Member
Posts: 0
|
Post by Deleted on Dec 17, 2008 21:08:25 GMT
Nearly there ... 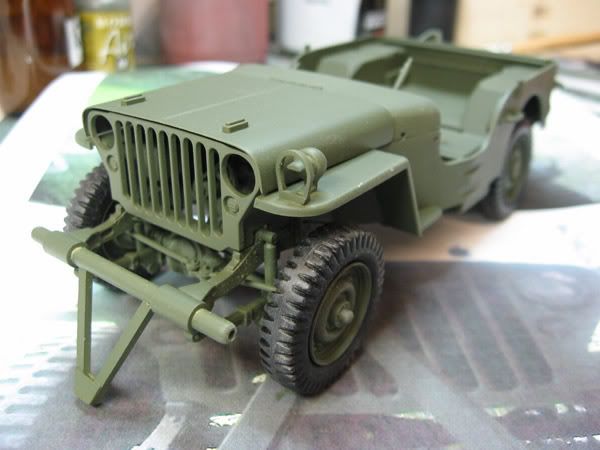 ... if I can finish all the fiddly bits tomorrow, I can scratch the gun carrier for the dash and begin the side panels ... we'll see? |
|
|
|
Post by pat on Dec 18, 2008 10:09:04 GMT
In reference to using something to simulate canvas. I have used used colour catcher sheets. I found this by accident after putting one in the tumble dryer, I used a thinned with water PVA glue and sprayed dust coats of Tamiya and Humbrol aerosol acrylics.
This gave quite a good effect.
|
|
Deleted
Deleted Member
Posts: 0
|
Post by Deleted on Dec 19, 2008 0:23:54 GMT
I managed to finish the front tow hitch and get it painted, and it works. I've been coughing and spluttering all day and it looks as though I've contracted man flu so I'm a bit bunged up and didn't feel like doing much this evening. I'll dose myself up and continue with scratch building the rifle carrier when I finish tonight (Friday), and also undercoat the canvas roof and seating. I also need to finish painting the dash and once that's done, I can continue adding the rest of the interior parts. I'm in the workshop all day Sunday, so should have the project just about done, more pics on Sunday evening. Still not sure about having time to construct the side covers, but I'm going to give it a try, whatever happens, the final deadline is Tuesday evening.
|
|
Deleted
Deleted Member
Posts: 0
|
Post by Deleted on Dec 21, 2008 12:29:22 GMT
Folks, I need your help and I need it urgently. I'm in the workshop today beavering away, attempting to do as much to this jeep project as I can in order to finish it. But I've just discovered that the I don't have the lettering for the following stensils ... 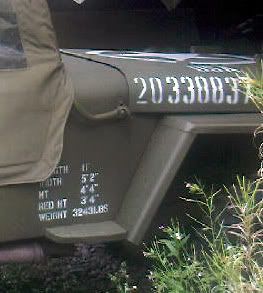 ... can anyone help with either a decal set, a stensil or the name of the font used? ... many thanks in anticipation. |
|
|
|
Post by alfie on Dec 21, 2008 13:30:22 GMT
Folks, I need your help and I need it urgently. I'm in the workshop today beavering away, attempting to do as much to this jeep project as I can in order to finish it. But I've just discovered that the I don't have the lettering for the following stensils ... ... can anyone help with either a decal set, a stensil or the name of the font used? ... many thanks in anticipation. Nick Try here for a demo version of a military stencil font www.tlai.com/med_des/mdsta.htmlRegards, Alfie |
|
Deleted
Deleted Member
Posts: 0
|
Post by Deleted on Dec 21, 2008 18:18:01 GMT
Ayup Alfie, thanks matey. Well it looks a though time has beaten me, the model is just about complete apart from the side screens which unfortunately will not be attempted. I've been in the workshop for most of today, just come inside for a quick break and a drink. I've had a couple of catastrophe's today, two of the wheels have snapped which caused a delay as I had to repair them, then I inadvertently dropped superglue onto the side of the model which had to be cleaned off, sanded and then repaired.
Right then, refreshed and back out to the workshop for an hour or so, photos later ...
|
|
Deleted
Deleted Member
Posts: 0
|
Post by Deleted on Dec 21, 2008 20:44:12 GMT
As promised, a couple of photos of construction from today ... 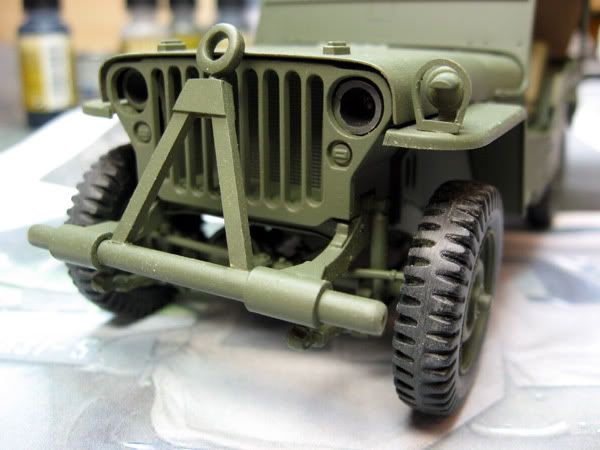 ... the tow bar is finished, I've still got to add the strap to hold the bar to the vehicle, and add the lights of course. Most of the kit parts have been painted and added to the model ... 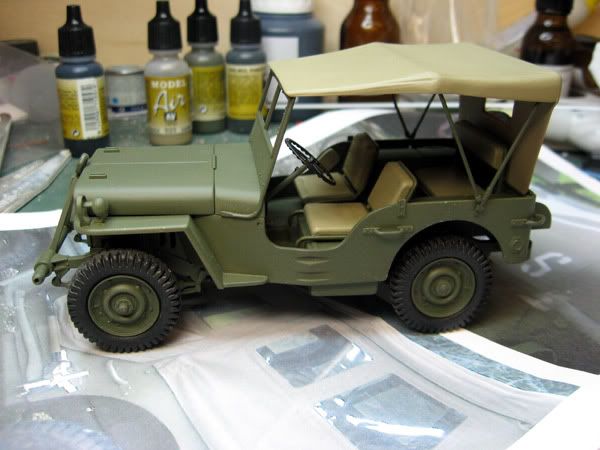 ... still to be added are the spade and axe. There's a small list of stuff still to be done to complete the model, although it will go right to the wire on Wednesday evening, I just hope I can complete it without causing any further damage. |
|
|
|
Post by neilscrim on Dec 22, 2008 8:10:52 GMT
Very nice and the colour looks spot on, what paint did you use?
|
|
|
|
Post by The Hooded Claw on Dec 22, 2008 9:27:49 GMT
Looks good Nick, I'd be pleased to receive that for Christmas
H
|
|
 Members' Forum")